Hi, In this post we will guide you how you can enable hardware accelerated GPU Scheduling in Windows 11. Windows is the go-to choice for gamer since it supports a wide range of hardware and gets new gaming-related features frequently. Aside from that, Windows aims to make the most of your hardware. By offloading some CPU-bound tasks to the GPU, Hardware-Accelerated GPU Scheduling improves graphics performance.
Starting with its Windows 10 May 2020 update, Microsoft supports Hardware-Accelerated GPU Scheduling on all Windows versions. In part, the lack of clarity about how the feature works has prevented its use from taking off. We will explain Hardware-Accelerated GPU Scheduling and how you can enable it on your Windows 11 PC so that you can better understand this feature.

Windows has a feature called Hardware Accelerated GPU Scheduling. The feature has been available since Windows 10 (Build 2004). In this feature, high-priority threads of instructions, like rendering frames, are passed directly to the graphics processor instead of the CPU. By using frame buffering, you can save time and reduce input latency. This frees up the processor from running commands in batches, while also making the most of the graphics processor.
However, this feature does not work like a magic switch. You won’t notice a significant improvement in framerates or performance in games right away. Additionally, it only works when you are using multiple apps that require GPU usage. The Hardware-Accelerated GPU scheduling is in its early stages and is intended to work with the requirements and needs. In addition, Microsoft’s future updates will only enable more benefits with this stepping stone.
In order to learn how to enable Hardware-Accelerated GPU Scheduling on your Windows 11 PC, let’s begin by comparing the advantages of Hardware-Accelerated GPU Scheduling with CPU-based scheduling.
Through Hardware-Accelerated GPU Scheduling, all aspects of graphical processing are handled by the GPU instead of the CPU. It helps reduce input lag, or the time it takes for the GPU to load up a frame that can be displayed on your screen after you press a key or move your mouse.
By enabling Hardware-Accelerated GPU Scheduling, the CPU won’t have to continuously produce the frame data required by the GPU. By reducing CPU utilization and improving its clock speeds, processing-heavy tasks can be handled smoothly.
Hardware-Accelerated GPU Scheduling reduces CPU utilization, allowing the CPU to run faster and longer at a lower temperature without overheating due to the lower CPU utilization.
As long as your PC has the required hardware and software to support Hardware-Accelerated GPU Scheduling, there are no disadvantages. Nevertheless, you may notice a slight increase in GPU usage and power consumption.
HOW TO ENABLE HARDWARE ACCELERATED GPU SCHEDULING
Let’s take a closer look at how you can enable Hardware-Accelerated GPU Scheduling on your Windows 11 PC now that you know what it is and how it can be beneficial.
How to Enable Hardware-Accelerated GPU Scheduling Using the Settings App
Windows 11 disables hardware-accelerated GPU scheduling by default. You’ll have to enable it. This feature can be toggled in the Settings app. You can access the same on your PC by following these steps:
- Open the Settings app by pressing Windows + I.
- On the System tab, click the first option that says Display in the Settings window.
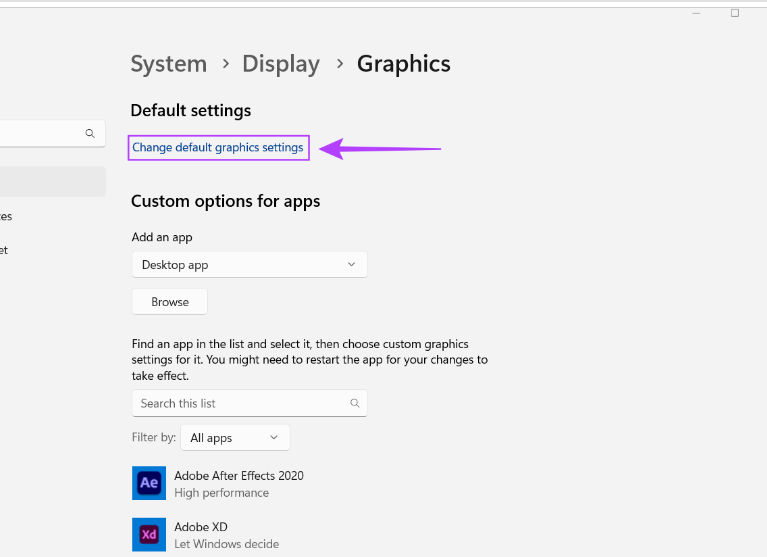
- Scroll down and click Graphics under Display settings.
- In the Default Settings section, click the blue ‘Change Default Graphics Settings’ button.
- To apply the changes, restart your PC after turning on the toggle for the ‘Hardware-Accelerated GPU Scheduling’ on the Default graphics settings screen.
Enable Hardware-Accelerated GPU Scheduling Using Registry Editor
The Registry Editor can also enable Hardware-Accelerated GPU Scheduling on your PC, in addition to the Settings app.
If you’re not careful, modifying the Windows Registry can cause serious problems. Before you make any changes to the registry, we recommend that you create a full backup of it.
- Open the Run dialog by pressing Windows key + R and typing regedit in the text field. Once you have done that, press Enter.
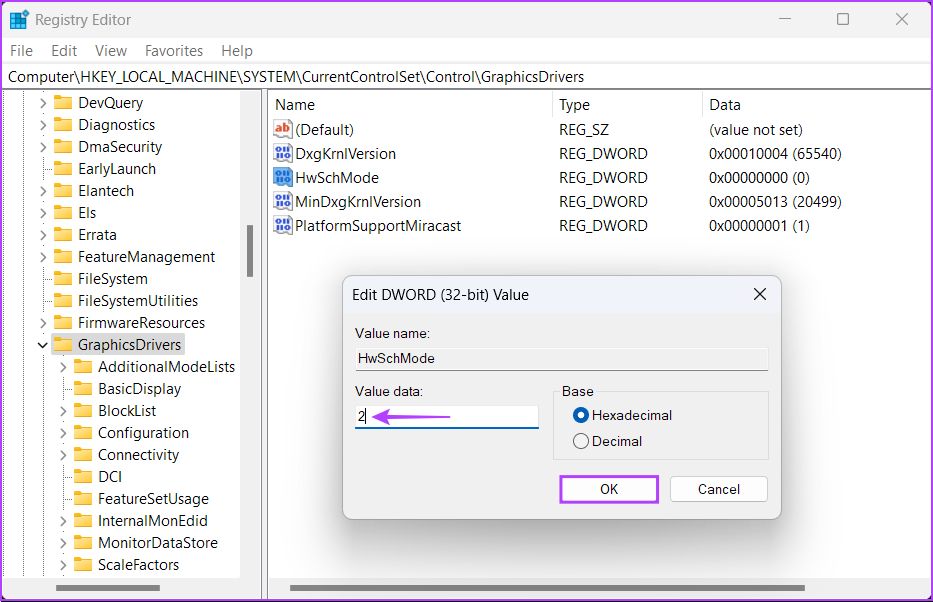
- The second step is to copy and paste the following location into the Navigation bar:
"HKEY_LOCAL_MACHINE\SYSTEM\CurrentControlSet\Control\GraphicsDrivers"
- To create a new DWORD (32-bit) value, type HwSchMode and press Enter.
- The next step is to edit the value of the new HwSchMode DWORD after you’ve created it.
- Set the value data of the Edit DWORD (32-bit) Value dialog to 2 when it appears. Click OK to continue.
If you enable Hardware Accelerated GPU Scheduling on your PC, you may not see a huge improvement in graphics performance, but you might see a decent decrease in your PC’s CPU usage when performing graphic-intensive tasks. Thus, your PC will be able to run a bit faster since there will be enough CPU resources left for other CPU-bound tasks.